Low light image enhancement locally and privately in the browser
This week's blog post showcases how to perform low-light image enhancement entirely in the browser. I will demonstrate the steps required to transform a PyTorch model into an ONNX model and explain how to get it running in a Vue.js application.
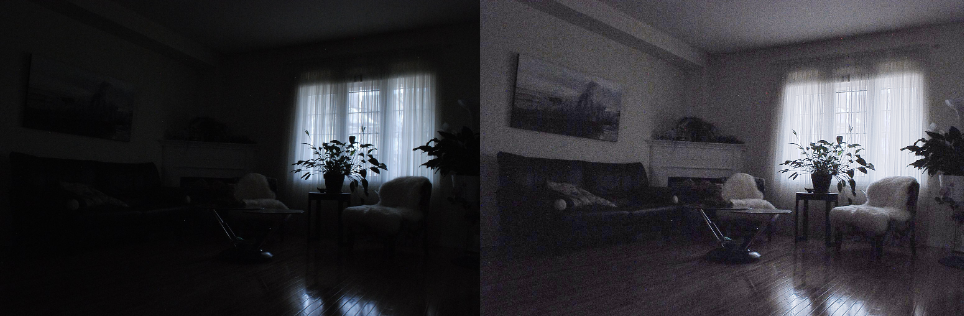
The final outcome of this process will enable us to execute transformations such as the one illustrated below:
All relevant resources can be found here:
The plan
After last week's post about using the HuggingFace TransformersJS library for image super-resolution in the browser, I've decided to delve deeper into the library's underlying execution environment, specifically the ONNX runtime. The goal is to convert a pretrained PyTorch model into the ONNX format and then seamlessly integrate it into a Vue.js application.
For this project, I've chosen the Self-Calibrated Illumination (SCI) model from the paper Toward Fast, Flexible, and Robust Low-Light Image Enhancement by Ma et al. he reasons are twofold: the authors have generously provided the pretrained model and code on their Github Repository, and the model is remarkably compact, approximately 44KB in size, ensuring swift performance in the browser.
Transforming the Model to ONNX
In the previous sections, we discussed how the HuggingFace TransformersJS library leverages the ONNX runtime for executing models on the web. But what is the ONNX runtime exactly? According to the ONNX website, it is described as:
ONNX Runtime is a cross-platform machine-learning model accelerator, with a flexible interface to integrate hardware-specific libraries.
This means the ONNX runtime facilitates the execution and porting of machine learning models across various platforms. The typical workflow for utilizing the ONNX runtime is as follows:
- Train a model in your favorite framework (e.g. PyTorch, TensorFlow, etc.)
- Export the model to ONNX format
- Load the model into the ONNX runtime of your choice ( ONNX Runtime for C#, ONNX Runtime Web, etc.)
With the low light image enhancement model already trained and the weights already made available by Ma et al. the only thing left for us to do was to convert the model to the ONNX format.
import onnxruntime as ort
import torch
import torch.onnx
import model # Is a pytorch nn.Module

model.eval()
scripted_model = torch.jit.script(model)

dummy_input = torch.randn(1, 3, 1000, 1000)
dynamic_axes = {
  "input": {0: "batch_size", 2: "height", 3: "width"},
  "output": {0: "batch_size", 2: "height", 3: "width"},
}
torch.onnx.export(
    scripted_model,
    dummy_input,
    "model.onnx",
    export_params=True,
    verbose=True,
    input_names=["input"],
    output_names=["output"],
    dynamic_axes=dynamic_axes,
)
Let's examine the code in detail. After importing all the necessary libraries, we first prepare the model:
model.eval()
scripted_model = torch.jit.script(model)
The model.eval(), puts the model in evaluation mode, which is crucial for exporting and inference. It turns off certain layers like dropout and batch normalization that behave differently during training. The torch.jit.script(model) function converts the model to a TorchScript representation. This step is particularly useful for complex models with dynamic control flows (like loops and conditionals) which might not be directly exportable to ONNX.
Once the model is prepared, we generate a dummy input and specify the axes in the ONNX model that we want to be dynamic. For our purposes, these are the batch size, height, and width. By doing this, we enable the model to process images of any size and batch size.
In the last step we export the model to the ONNX format using the torch.onnx.export function.
Integrating the ONNX Model into a Vue Application for Browser Execution
With the model now converted to the ONNX format, our next step is to integrate it into a Vue.js application for execution in the browser. While this process is straightforward, there are some potential pitfalls to be mindful of.
The first step involves installing the onnxruntime-web package, which will allow us to load and run the model.
import * as ort from "onnxruntime-web";
const executionProviders = ["wasm"];
session = await ort.InferenceSession.create("./model.onnx", {
  executionProviders,
});
Note
A common problem that I and others have encountered is that the application can not find the .wasm files that are needed to initialize the ONNX web runtime and execute the model when running the application with vite application.
The solution that worked for me was to place the .wasm files from the onnxruntime-web package into the public folder of the vue application and then load the initialize the runtime with the following code:
import * as ort from "onnxruntime-web";

ort.env.wasm.wasmPaths = {
  "ort-wasm.wasm": "./ort-wasm.wasm",
  "ort-wasm-simd.wasm": "./ort-wasm-simd.wasm",
  "ort-wasm-threaded.wasm": "./ort-wasm-threaded.wasm",
};
If someone has a better solution to this problem please let me know.
Correctly Processing Input and Output for the Model
Once the model is successfully loaded, a crucial step remains: accurately processing and preparing the input. This involves normalizing the input data and transposing it into the format that the model expects, which is CHW (channel, height, width).
Why CHW?
It seems to be mostly due to historic reasons see Pytorch forum. The HWC format seems to be actually more efficient for some convolution implementations.
export function getImageData(image) {
  const canvas = document.createElement("canvas");
  const ctx = canvas.getContext("2d");
  canvas.width = image.width;
  canvas.height = image.height;
  ctx.drawImage(image, 0, 0);
  return ctx.getImageData(0, 0, canvas.width, canvas.height);
}

export function normalizeAndTranspose(imageData, width, height) {
  const float32Data = new Float32Array(width * height * 3);
  const rArray = new Float32Array(width * height);
  const gArray = new Float32Array(width * height);
  const bArray = new Float32Array(width * height);

  for (let y = 0; y < height; y++) {
    for (let x = 0; x < width; x++) {
      const idx = (y * width + x) * 4;
      const i = y * width + x;
      rArray[i] = imageData.data[idx] / 255;
      gArray[i] = imageData.data[idx + 1] / 255;
      bArray[i] = imageData.data[idx + 2] / 255;
    }
  }

  float32Data.set(rArray);
  float32Data.set(gArray, rArray.length);
  float32Data.set(bArray, rArray.length + gArray.length);
  return float32Data;
}
After processing the input we can run our model using the ONNX runtime.
const imageData = getImageData(image);
const float32Data = normalizeAndTranspose(imageData, image.width, image.height);

const tensor = new ort.Tensor("float32", float32Data, [
  1,
  3,
  image.height,
  image.width,
]);

const output = await session.run({ input: tensor });
And finally we need to transform the output back to the HWC format and de-normalize it.
export function transformAndTranspose(outputTensor, width, height, channels=3) {
  const transposedData = new Float32Array(width * height * channels)
  for (let h = 0; h < height; h++) {
    for (let w = 0; w < width; w++) {
      for (let c = 0; c < channels; c++) {
        transposedData[h * width * channels + w * channels + c] =
          outputTensor.data[c * height * width + h * width + w]
      }
    }
  }

  // Scale to [0, 255] and create Uint8ClampedArray for canvas
  const outimageData = new Uint8ClampedArray(width * height * 4)
  for (let i = 0; i < transposedData.length; i += channels) {
    for (let c = 0; c < channels; c++) {
      outimageData[(i * 4) / 3 + c] = Math.min(
        255,
        Math.max(0, Math.round(transposedData[i + c] * 255))
      )
    }
    outimageData[(i * 4) / 3 + 3] = 255 // Alpha channel
  }
  return outimageData
}
This was the last step and the only thing left for us to do is to display the result. The full code can be found in the Github repository.
Conclusion
In this week's blog post, we explored the process of converting a PyTorch model into the ONNX format and demonstrated how to execute it in a browser using the ONNX runtime. Additionally we have seen how to integrate the model into a vue application and avoid the most common pitfalls.